
Debian on a Thinkpad T14 AMD Gen5
Intro
Since my previous workhorse laptop was showing it's age, I had been looking for a replacement for a while. After much deliberation, I got the choice down to 2 options; The Frame.Work 13 with AMD Ryzen and 2.8K display (which is still in pre-order phase), and the Thinkpad T14 AMD Gen5 which can also be had with a 2.8K OLED display.
I've always been a Thinkpad user (at least for the last 20 years), and I've tried out the Frame.Work when some friends had one around, but I keep preferring the Lenovo keyboards and trackpad with buttons (for the trackpoint). The Lenovo also had the advantage of coming with more ports, as it has 2x USB-C, 2x USB-A and seperate UTP, HDMI and Minijack, where the Frame.Work only has the 4 USB-C ports with optional modules for other ports. The Thinkpad was also available directly (built-to-order, but with a 1 week lead-time) and seems to be as repairable as the Frame.Work, and comes with 3-year warranty and on-site service. So the Thinkpad was my choice again this time.
Specs
Thinkpad T14 AMD Gen 5
2.8K Matte OLED
AMD Ryzen 7 Pro 8840U
8GB Ram, but have upgraded this after-market to 64GB DDR5-5600
256GB WD-Black SSD, replaced with a 2TB model after-market (m2.2280)
No OS, which gets you a $60 discount at Lenovo
Fingerprint reader, Smartcard reader, both seem to 'work'
Installation
Installation of debian 12 went reletively smooth, though I did run into some issues downloading the kernel-package from the updates repository, which seems to have gotten corrupted. This was fixed by doing the installation from a German mirror first, and changing back to deb.debian.org later. For better support I've also enabled the bookworm-backports repository and installed the latest bpo kernel (6.9.7+bpo-amd64) at this time.
Secure-boot and UEFI didn't give me any issues and running with Luks+LVM+XFS also went smooth.
The only hardware related issue I've run into at this time, is the occasional amdgpu crashes (hopefully fixed now) and a hang when connecting to my thunderbolt-dock with attached HDMI monitor. In this case the AMDGPU driver tries to (and fails/hangs) read the EDID information for the HDMI monitor, and this pauses/hangs the entire system unill either the dock or the monitor is disconnected. Sometimes the monitor will be recognised as a 640x480 screen, and the system will continue, but this is quite useless.
For now I've disconnected the 2nd monitor from the dock, and it's connected directly to the HDMI port on the laptop, and there it works fine in 4k 60Hz mode (which is all this Acer KG281K can do).
Software setup
After 20+ years of using Gnome (and mostly Mate/Gnome-Classic the last few years), I've switched over to KDE on this laptop. So far I quite like it, but I've had to make some small tweaks here and there to get it working how I'm used to.
I quite like the KDE-Connect android app, which lets me control the laptop from the phone, This will be nice to use for presentations.
AMD GPU
The amdgpu driver and firmware that came with debian 12 has been giving me some issues, with random crashes of the GPU and wayland drivers, but after a lot off fiddling, it seems to be stable now with the following combination of changes from debian 12 default:
Install latest backport kernel
Manually install latest amdgpu firmware from kernel.org mirror
Add the 'amdgpu.gpu_recovery=1 rtc_cmos.use_acpi_alarm=1' options to the kernel commandline
Weirdness
The specsheet/ordersheet from Lenovo claims the display is 60Hz, but KDE's display properties will let me choose 120Hz on the internal display.
Even in idle (with just some browsers running) the fans seem to be running at a quite audible level around 3000rpm, causing a constant wind-noise. For the time being i've propped up the laptop on a stand, which seems to keep it a bit cooler than just standing flat on my desk the entire day.
Automating (Wildcard) certificate renewal with Acme.sh, DeSec.io and some DNS magic
Automatically requesting TLS/SSL certificates using the ACME protocol is quite nice. Usually to just get a regular TLS certificate, you just have to run an ACME capable tool or webserver, which will place a textfile in /.well-known/acme-challenge on your webserver, which is then used to validate control over the domain.
Alternatively you can use DNS based validation. This is even required when requesting wildcard certificates, for example, when requesting a certificate for '*.sig-io.nl'.
When validating using DNS, you need to have your ACME client create a DNS record '_acme-challenge' in your DNS domain. This can be done using various ACME clients, and I myself have written modules/plugins for Dehydrated for various DNS providers over the years.
Recently I've switched from Dehydrated as my preferred ACME client to Acme.sh. This client has a massive amount of DNS providers supported in the main codebase. So it will usually have an interface to whatever DNS system you might use.
Some of my customers however use domains hosted by (for example) TransIP.nl, which does have an API to update DNS-records, but usually takes very long (5-10 minutes) to update records, and also has no granulated access-control to their API. If you have API access, you can do everything with all domains under that account. This means you can't really leave credentials to this account in config-files somewhere.
However, I've now found a solution to these problems that I'm quite satisfied with. I'm using deSEC.io, a new non-profit, community-oriented DNS provider, with a nice API to do DNS validations. With deSEC I can create an API key that is limited in time and source-network. And since deSEC is free, I can create a seperate account just for acme-validation on an otherwise unused domain.
So to create a certificate for a customer-domain, I just have them create a CNAME entry in whatever DNS system they use, which points to my acme-validation only domain-name hosted at deSEC.io.
For example, for sig-io.nl I could create a CNAME record '_acme-challenge.sig-io.nl' pointing to '_acme-challenge.sig-io.nl.acme.example.com'. And then (given that example.com is a domain I manage with deSEC.io) use Acme.sh to create certificates using this alias domain using:
export DOMAIN="sig-io.nl" acme.sh --issue -d "*.${DOMAIN}" --challenge-alias "${DOMAIN}.acme.example.com" --server letsencrypt --dns dns_desec
LUA-DNS migration
At Sig-I/O we have (mostly) been using OpenProvider for DNS registrations and hosting over the last few years. This has mostly been fine, but OpenProvider has been having some issues every now and then, and is changing things, but not allways for the better.
After a period of stagnation, they now seem to be developing new features again, but none of those appeal much, while important bugs and wishlist items remain unfixed.
We've been looking at alternatives for at least the DNS hosting parts for a while, and even started looking into setting up our own anycast network of DNS servers, but concluded that his was too much effort (and money) for what we needed, so the search for a good matching DNS provider was continued.
After looking at various options, and trying out some of them with test-domains, we were most charmed with LuaDNS.net, which is a small Romenian company with a nice working anycast DNS system and an interesting method for pushing DNS updates.
LuaDNS has a webinterface for inspecting the zones and records that are served by their servers, but this interface doesn't allow updates. For updating DNS records there are 2 possible options:
Using a REST api
Using GIT and a notify-hook
Using the REST api
We use the REST-api for updating temporary records, like the 'acme-challenge' records needed for ACME validation by Lets-Encrypt, ZeroSSL or BuyPass. This is done using the dns_lua hook in acme.sh
Using GIT and notify-hooks
The primary method to add zones and records to LuaDNS is by creating a lua-script or bind-formatted file in a git repository. This has the added benefit of having an archive of all previous DNS records. In our case, we host the git repository ourselved on a Gitea instance.
Every time a git commit is pushed to this Git repository, gitea sends a webhook to the LuaDNS api server, which then clones the git repository, parses the lua-scripts and/or bind zone files, and updates its zone files. A log of this parsing it then sent via e-mail to the admin account.
DNSSec
LuaDNS supports DNSSec, which we had enabled at OpenProvider as well, so for the migration to LuaDNS we temporarily disabled this (to ease migration). Sadly, LuaDNS doesn't allow configuring (or querying) the DNSSec keys from the API at this point, but when we asked about this, we got a quick reply that this would be added in the coming weeks.
Update 2022/07/12: I just got an e-mail from LuaDNS that this feature has been added, so there is an API endpoint for DNSSec now.
This however meant that configuring the DNSSec keys was still somewhat of a manual excersize at this time. We manually enabled DNSSec on all LuaDNS hosted zones and copy/pasted the public-keys to a textfile. We then used the OpenProvider API to reconfigure all our zones to be hosted by LuaDNS and configured the DNSSec keys at the same time.
This mostly worked, though some domains gave some issues, so these were then updated by hand.
Updating the zones in Openprovider can be done with this api-call:
curl -X PUT \
  https://api.openprovider.eu/v1beta/domains/${ID} \
  -H "Accept: */*" \
  -H "Authorization: Bearer ${OPENPROVIDER_API_BEARER}" \
  -d "{ \"ns_group\": \"luadns\", \"dnssec_keys\": [ { \"alg\": 13, \"flags\": 257, \"protocol\": 3, \"pub_key\": \"${DNSSEC}\", \"readonly\": 1 } ] }"
Where {ID} is the ID of the zone at OpenProvider (which we gathered in a previous script), and {DNSSEC} is the DNSSec key from LuaDNS, which we manually gathered.
Post Migration Checks
After migration we received an e-mail from dnssec-tools, complaining about missing records we had earlier, so we re-created some tlsa-records and did some more checks while we were at it.
Some handy tools to check your various settings and configurations:
Various SSL/TLS related sites and services
Upto this week (end January 2020), a friend of mine used to run a couple of SSL/TLS related websites (cipherli.st, certificatemonitor.org, ssldecoder.org) which I used quite frequently. Sadly he has decided to no longer host these sites, for reasons undisclosed. I've taken it apon me to host alternative versions of these services, as I myself use them a lot, and also think they shouldn't disappear from the internet.
Since I do not control the original domain-names, these services can now be found under the following new URL's:
https://ssldecoder.eu -- Print information about site-certificates or CSR's
https://sslmonitor.eu -- Get mail notifications about expiring certificates
https://cipherlist.eu -- Recommended TLS/SSL configurations for populair services
This was quite easy and quick to get running, as Raymii was so friendly to have all the source-code to these services on his github. I've made personal forks of the various repositories, where I will try to keep them somewhat maintained.
Contributions and additions are more then welcome, please visit the relevant sites for links to their github pages.
The CfgMgmtCamp 2019 Recording Setup
As in earlier years, Sig-I/O takes care of some of the lecture recordings at various conferences like CfgMgmtCamp, LOADays, HackerHotel, Eth0 and Techtalks at IT-Gilde, Revspace and Bitlair.
During one of these recording sessions, JJ Asghar (@jjasghar), asked about the video setup and asked if there was a blog-post about how it worked. This will be that blog-post.
Basics
The basics for the recording setup being used is founded on the use of Open Source / Free Software and affordable hardware. Originally a Firewire based camera setup and dv-grab were being used, but since new machines with firewire have been getting harder and harder to find, a switch to something more modern was needed.
The current recording setup consists of the following:
2 USB3 HDMI capture cards
A camera with HDMI output, and preferably some form of audio input and connected to the HDMI capture card.
HDMI Splitter between the presenter's laptop and the projector, with the second output going to our HDMI capture card.
A reasonably fast/modern laptop (i5-6th gen or newer) with USB3 ports running Linux.
Open Broadcasting Studio software (obs-studio.org)
The Camera
Currently, 3 different camera's are being used, with their own pro's and con's. For our requirements, the following features are ranked most important:
HDMI Output (SDI would also be appropriate, but it much more expensive)
XLR Audio inputs (for connecting to the sound-mixer / microphones)
Dual SD-Card slots for continuous-recording (nice to have)
Low-weight, so the camera can be oriented vertically (9x16)
AC/DC power input, so we can run continuously without using batteries
The specific camera's in use:
Canon XA10, nice and small, internal 64GB flash and dual SD-slots, 2 XLS's and minijack audio input, basically everything we need. (No option to have XLR+internal mic running at the same time though).
Panasonic AG-AC90, large, featurefull, good optics, 2 XLR's and internal mic, all switchable. 2 SD-cards and good audio tuning/interface.
Sony (model unknown), records to tape only so no backup to SD-cards, HDMI output, proprietary batteries and hard to find an AC-adapter for, not recommended.
Audio
In many larger venue's amplified audio is essential, so an audio hookup using an XLR cable is preferred (with the mic-signal from the speaker). This will allow us to get a clear and crisp audio input for our recording.
For smaller venues or if there is no audio equiptment present, we usually use some Samson Concert 88 series wireless microphones/beltpacks, as these are decent and affordable, though not as good as the (way to expensive) senheisers.
When a speaker used video and/or audio in their presentation, this will also be received when it is sent over the HDMI port (not always the case). One or more seperate handheld microphones are nice to have, so the presenter can be introduced or mic's can be put in the room for questions.
USB HDMI Capture
Affordable USB-3 HDMI capture cards are available from the usual chinese websites, and are mostly clones of Magewell capture cards. Expect to pay about $60 to $110 for them, and steer clear of the $20 ones, as these are SD-TV capture cards with an HDMI port. The quality on those cheap ones is beyond useless.
The 'good' ones will be marked with words such as: HDMI USB3.0 1080P HDMI Video Capture Card for Windows/Linux/Mac USB UVC UAC.
Basically, these are HDMI input ports which present themselves as generic USB webcam's and audio sources to the computer, and they work with the generic webcam drivers (USB Video Class, USB Audio Class) available in Windows, Mac and Linux.
Open Broadcasting Studio
The final piece of the pie is OBS, a bit of open-source software meant for webcam streaming. In my setup I usually hook up the 2 video/audio sources, name one 'Camera' and the other 'Speaker' or 'Projector', add a logo and titles (using the chatlog feature).
By orienting the camera vertically, the 2 video-streams can be combined more efficiently, leaving out less empty space. OBS allows you to configure various scenes beforehand, and quickly change between these at runtime. It's handy to have a full-screen projector version, some picture-in-picture scenes, and a default scene with everything.
In OBS you can also configure your livestream, for example to Youtube or Twitch (and various other sites/methods).
At most events (with enough bandwidth) we livestream to youtube and simultaniously record to disk. The camera itself is also recording constantly, and this recording can be used in case of issues with the computer-recording or as an audio-source then needed.
Encoding
After the event is completed, the recordings are usually edited using kdenlive to cut out the idle bits before and after the talks, long questions where there isn't a microphone in the room and for delays in demo's / mistakes.
A title-card is added which will give some info about the video and the event. When editing is complete, the video is re-encoded as VP9/Webm for upload to youtube and the event website.
Upload to youtube
Uploading to youtube is done manually, with texts and titles copied from the event schedule. In case of CfgMgmtCamp, most speakers have a twitter-account, and a tweet is sent out with the link, title and hashtags for the video.
When the edited video's have been uploaded to youtube, the livestream versions are usually taken offline, as these are of lower quality.
Improvements for next time
For the next conference, some improvements that can be made:
Recodings in more rooms, even if it's just a static unmanned camera, as long as it's on a tripod or fixed mount, audio input would also be preferred, unless the camera is really up close and personal, so the internal mic would have enough signal.
Whitelist MAC-addresses for wired uplinks beforehand (Venue blocked youtube)
Working on a Linux System Administration Book
With the release of the first beta version of RHEL-8, and more Linux trainings coming up in the coming months, I've decided to start writing some educational documentation for Linux System Administration on modern versions of CentOS, RHEL, Debian and Ubuntu. The plan is to do this as an Open-Source project and modern open-source methodologies.
The book is begin written using reStructuredText (just like this blog), to be processed into webpages and PDF documents by Sphinx.
To check out the current status (which is still quite limited, as I started this project 2 days ago), see the latest rendered version at https://linuxsysadminbook.sigio.nl/
Currently the source is hosted in a private repository on Bitbucket, but if the project gets a bit more mature, it will most likely be moved to either a public Bitbucket repository, or more likely a public github repository.
Getting (fast) IPv6 at home
IPv6
I value IPv6 access as quite important, however T-Mobile Thuis doesn't offer any official form of IPv6 on their network at this time. I looked into various options to get decent IPv6 for my home network:
6to4
HE.net tunnelbroker
VPN based access
6in4
6to4 is a deprecated form of IPv6 access, but something that would work for any connection with a fixed IPv4 address. Configuring 6to4 on OpenWRT is quickly done, and it was easy to delegate a /64 subnet to my local network. 6to4 however results in a quite slow connection (of around 10 to 20 megabit), and reachability was spotty at best.
HE.net tunnelbroker
Upto a couple of years ago there used to be various public tunnelbrokers for 6in4 tunnels, and I used the sixxs.net tunnels for almost 10 years myself, however, almost all public tunnel-services seem to have shut down over the years. Only HE.net's tunnelbroker seems to be alive.
I have used a couple of HE.net tunnels throughout the years, and while they work fine in general, they seem quite limited in available bandwidth. This became even worse as sixxs.net shutdown, as most sixxs users migrated to HE.net.
Configuring OpenWRT to use a HE.net tunnel is quite easy, just a matter of copy/pasting the values from your HE.net account into OpenWRT's webinterface and providing credentials for the dynamic updating of the tunnel.
I did some speed-tests and these confirmed my experience, I seemed to be limited to maybe 20mbit, which is a bit low when using a 700+ mbit connection, but this is to be expected for a free service. If your needs are limited, HE.net is a good and free solution.
VPN based access
The third and final method of getting IPv6 that I tried was tunneling over IPv4 to my own server in a public datacenter. At that server (hosted at Hetzner) I have a /56 of IPv6 space, This is not standard, but available on request, and you get a /64 standard with every server or VPS.
I configured wireguard on OpenWRT (client) and my server in the datacenter, and route a /60 subnet of IPv6 space to my home-network. This range can then be split further for a couple of subnets. The remainder of the /56 can be used for some more VPN's and tunnels.
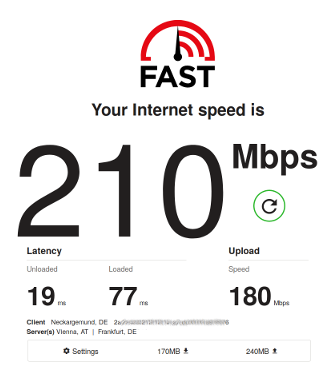
Using the Wireguard VPN and testing speed on IPv6 I could easily get over 200mbit per second and I have even seen it hit 500mbit.
Todo
Try and get IP-TV working, though this doesn't have much priority for me
Cancelling voice and tv-subscriptions before the discount runs out :)
OpenWRT Config
Various bits of relevant configuration for OpenWRT:
The configuration of the switchports:
config switch
  option name 'switch0'
  option reset '1'
  option enable_vlan '1'

config switch_vlan
  option device 'switch0'
  option vlan '1'
  option ports '1 2 3 4 6t'
  option vid '1'

config switch_vlan
  option device 'switch0'
  option vlan '300'
  option vid '300'
  option ports '0t 6t'

config switch_vlan
  option device 'switch0'
  option vlan '640'
  option vid '640'
  option ports '0t 6t'

config switch_vlan
  option device 'switch0'
  option vlan '100'
  option ports '0t 6t'
  option vid '100'
Configuration of the Wireguard VPN for IPv6 tunneling
config interface 'WG6'
  option proto 'wireguard'
  option private_key '<wireguard-private-key-base64>'
  list addresses '2001:xxxx:xxx:xxx::3/60'

config wireguard_WG6
  list allowed_ips '::/0'
  option endpoint_host 'ipv4-of-wireguard-server'
  option endpoint_port 'wireguard-portnumber'
  option persistent_keepalive '25'
  option description 'Wireguard-ipv6-tunnel-name'
  option public_key '<public-key-of-wireguard-server-in-base64>'
  option route_allowed_ips '1'

config route6
  option interface 'WG6'
  option target '0::/0'
  option gateway '2001:xxxx:xxx:xxx::1'
T-Mobile Thuis (fiber) with a custom router
I have been using Tweak.nl as my ISP for a few years now, since getting fiber-to-the-home, but Tweak doesn't have their own (non-KPN (incumbant dutch telco)) infrastructure in my area. This means they are limited in offering products provided by KPN, at prices mostly dominated by what they have to pay KPN to get access to the last-mile. In area's where they do have their own fiber infrastructure they can offer gigabit connections at very nice prices (less then €400 per year) and 10-gigabit even, but this is a bit overkill, especially since traffic is then quite limited :)
T-Mobile Thuis (which used to be Vodafone Thuis, but had to be split-off from Vodafone due to anti-compete measures) does have it's own infrastructure in my area, which means they can provide their own networking products. This translates into getting a symmetrical 750 mbit connection for €40,- per month (Sold as €50,- with a permanent 10,- discount). It can also include voice and TV-services, but these cost extra, and would only with if you let T-Mobile control your network by using their router.

Sadly they still don't provide any form of native IPv6 connectivity, and I'm not too fond of letting ISP's control my routers and internet-infrastucture, so I looked into ways to get a fast and affordable connection whule using my own router, preferably running OpenWRT.
After some research on the Tweakers.net and T-Mobile Thuis web forums I was sure that it wouldn't be too hard to get a fast internet-connection on T-Mobile Thuis using my trusty OpenWRT routers. The requirements basically come down to:
Some way to connect to the fiber-connection
A fast enough OpenWRT based router that can handle gigabit speeds
Support for VLAN's
I initially used a RouterBoard RB750Gr3, since I was already using that as a router for my Tweak connection, but I also had a few Edgerouter ER-X's around. Both routers basically are the same chipset, but with slightly different peripherals. The RB750 has a low amount of flash, but USB and MicroSD ports, so you can add external storage, the ER-X has no USB or MicroSD, but has 256MB of built-in flash, which is more then enough for everything you might want to install on it.
Both routers would be more then sufficient and powerful enough to route a gigabit connection, as they have 256MB of RAM, and a quad-core Mips24 800Mhz cpu. In the end I swapped out the RB750 for the ER-X, since I had a few of those and only one RB750 and would have no use for the USB port on the router.
Installing OpenWRT 18.06.1 is outside of the scope of this article, but I've written about installing it in an earlier post, and documentation is on the OpenWRT wiki
Connecting to the fiber
The first step is finding some way to connect the router to the fiber. There are basically 2 methods to do this:
Get a router with an SFP port,and use the SFP module that is provided by T-Mobile, as their own router also uses an SFP-port. This is most useful when the T-Mobile/Guidion mechanic has set-up your connection.
Use a media-converter. In my case, there was already a media-converter present, since this was the solution used by my two previous ISP's. This box connects to the fiber, and outputs the conneciton over a RJ45 connection. I used this connection to hoop up to the OpenWRT routers WAN port using a CAT5e cable.
If you want to go for the SFP method, be sure to get a router with SFP-ports, like the ER-X-SFP or the HEX_S
VLAN Configuration
T-Mobile Thuis uses a few different VLAN's, but for our use we only need to use the regular internet VLAN, which is vlan 300. Besides this vlan there is also vlan 100, which is used for T-Mobile's management and vlan 640, which is used for TV.
Configure the WAN port or port that's used for connecting to T-Mobile with the 3 tagged vlan's
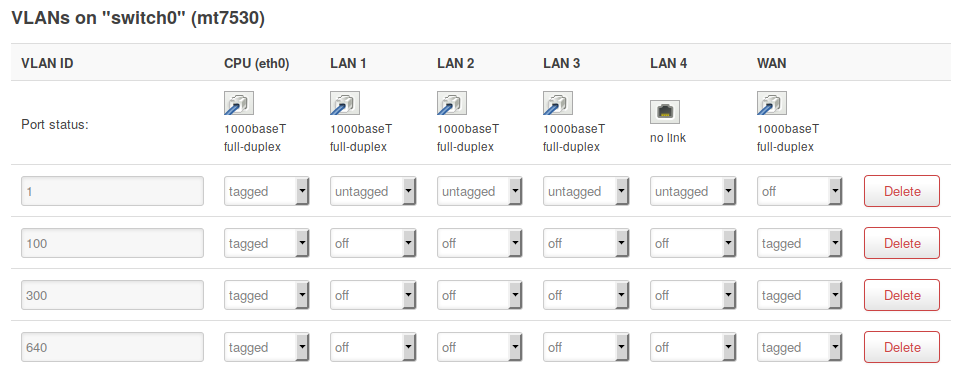
The internet vlan (300) will give you a public IPv4 address using a DHCP-request. This will also be the default gateway. The Management-lan (100) wil also respond to DHCP-requests, but only return adresses in 10.66.0.0/16 ip-space. There is some traffic on this network, but I haven't looked into it too much yet.
Television
Posts on various forums informed me that IP-TV is normally configured on the 640 vlan. I myself don't use much TV, so I haven't done any configuration yet. T-Mobile also lets you use TV-Anywhere, which is a mobile application (IOS/Android) for streaming TV on any internet-connection, so this can be used as a zero-configuration alternative. I might update this post or publish a new one when I get TV-Streaming working, but I'll probably cancel the TV and voice subscriptions before too long, I only took them because it was cheaper with then without (the first 6 months).
Todo
Try and get IP-TV working, though this doesn't have much priority for me
Cancelling voice and tv-subscriptions before the discount runs out :)
OpenWRT Config
Various bits of relevant configuration for OpenWRT:
The configuration of the switchports:
config switch
  option name 'switch0'
  option reset '1'
  option enable_vlan '1'

config switch_vlan
  option device 'switch0'
  option vlan '1'
  option ports '1 2 3 4 6t'
  option vid '1'

config switch_vlan
  option device 'switch0'
  option vlan '300'
  option vid '300'
  option ports '0t 6t'

config switch_vlan
  option device 'switch0'
  option vlan '640'
  option vid '640'
  option ports '0t 6t'

config switch_vlan
  option device 'switch0'
  option vlan '100'
  option ports '0t 6t'
  option vid '100'
Sig-I/O now 9 years old, debian-lts sponsor for 3
This week marks the 9th year in Sig-I/O's existance. Looking back over the past nine years shows a nice growth in the number of clients and a collection of interesting assignments Sig-I/O has been involved in.
While the services that Sig-I/O provides have shifted somewhat over these 9 years, some have also remained the same, with some clients already with us from the very beginning. The past few years have been mostly about Managed Hosting, Linux-, Ansible- and Security-Consulting and since a few years also Training, via a partnership with IT-Gilde which has been going steady for 3 years now.

This month also marks the 3rd complete year that Sig-I/O has been a sponsor of the Debian LTS project. This sponsorship has also been renewed for the coming year. The Debian LTS project could use some more sponsors, so if your organisation uses Debian servers extensively, it might be beneficial to sponsor them. Debian LTS will support Debian 7 until May of 2019, and will then continue with LTS support for Debian 8 into the 2020's
The next few years will undoubtedly bring many more interesting challenges and opportunities.
Migrated website to a static site powered by Nikola
As you might have noticed if you visited my site before, the entire look and feel has been changed. The site is now powered by the Nikola static-site-generator. The most-recent articles have been migated over, the older articles from the previous website will be restored when they are still relevant.
I had been thinking about using a Static-Site-Generator before, but wordpress was working quite well for me. Recently however I managed to lose my wordpress database, and this privided me with a good opportunity to re-do the site using Nikola.
I'm still getting the hang of writing reStucturedText, and still need to update some pages, but at least the website is back from the abyss. Most articles have been restored from the WayBack-Machine operated by Archive.org.
Using Nikola
In case you are interested in using a static-site generator, this is my workflow:
Stream some nice relaxing music
Install python3, setup a virtualenv for Nikola
Pip install "Nikola[Extras]"
nikola init mywebsite
Version the newly created site in git
Make some changes to the config-file
Choose and download a theme
Write some posts and pages (nikola new_post -e)
Git add all your changes, push to a remote server
Nikola build
Rsync the output directory to a webserver